Friday, November 26, 2010

Easy, Modular Code Sharing Across iPhone Apps: Static Libraries and Cross-Project References


Your Ad Here

Finding an elegant way to reuse and share code (i.e., libraries) across separate iPhone applications can be a bit tricky at first, especially considering Apple’s restrictions on dynamic library linking and custom Frameworks. Most people agree that the best solution is to use static libraries. This tutorial builds on that solution, showing how your Xcode project can reference a second Xcode project–one which is used to build a static library. This allows you to automatically build that static library with the rest of your app, using your current build configuration (e.g., debug, release, etc.) and avoid pre-building several versions of the library separately (where each version was built for a specific environment/configuration).

Problem: What’s the best way to share code across iPhone projects?

If you want to reuse/share code across different iPhone applications, you only have two options (that I’m aware of):
  1. Copy all of the source code from the “shared” library into your own project
  2. Keep the shared library code in a separate Xcode project and use it to build static libraries (e.g., libSomeLibrary.a, also referred to as “archive files”) that can be referenced by your project and used via static linking.

The first option, copying the files, should be avoided when possible since it’s inherently redundant and contrary to the goal of keeping “common code” modular and atomic. It’s a much better idea to put the code in a static library since, as mentioned in the introduction, dynamic linking to custom libraries/frameworks isn’t allowed by Apple when it comes to iPhone apps. If you’re not sure how to put your code in a static library, I’d suggest taking a look at this tutorial on the Stormy Productions blog.
So we’ve established that the second option is preferable, but there’s a catch: you’ll need to build and distribute multiple versions of the static library–one for each runtime environment and build configuration. For example, you would need to build both “release” and “debug” versions of the library for the Simulator, as well as other pairs for the iPhone or iPod device itself. How can we avoid manually pre-building and managing separate .a files?

Solution: Static libraries that are built on-demand via Xcode cross-project references

The trick to avoid pre-building static libraries for each environment is to use an Xcode “cross-project reference” so that those libraries are built dynamically (i.e., when you build your own app) using your app’s current build configuration. This allows you to both reuse shared source code and avoid the headache of managing multiple versions of the library. Here’s how it works at a high level:
  1. The shared code lives in its own Xcode project that, when built, results in one or more static libraries.
  2. You create an Xcode environment variable with a path to the directory that contains the static library’s *.xcodeproj file.
  3. All iPhone apps that need the static library will use the aforementioned environment variable to reference the library’s Xcode project, including any static library in that project and the related header files.
  4. Each time you build your project for a specific configuration/runtime environment, the shared project library will also be built for that config/environment–if it hasn’t already–and linked with your executable.
In addition to solving the main problem (reusing code and avoiding management of multiple library versions), there are a couple of nice benefits to this strategy. First, if you make changes to the shared library source code, those changes will immediately be included the next time you build your own project (via the cross-project reference). Second, you can modify the Xcode environment variable to point to different versions of any project. For example, you might have separate directories for “somelibrary-1.0″ and “somelibrary-2.0″; as you’ll see in the detailed solution instructions, it’s easy to modify the environment variable and switch your project to a different version of “somelibrary.”

Other Solutions

zerg-xcode

Victor Costan has developed a slick command-line tool called “zerg-xcode” which helps you copy the source code from one Xcode project (i.e., a static library project) into another Xcode project. In addition to physically copying the files, it inserts the targets from the “library” project into your “app” project. If the library project changes, you simply run zerg-xcode again with the approriate commands to sync the files and targets. Some people may find this tool very useful; my personal preference, however, is to avoid making any copies of the source code files and stick to Xcode’s built-in “cross-project reference” mechanism.

“Fat” Universal Binary

Another approach is to “bundle” two versions of a static library into a single file, referred to as a “fat” universal binary (see this post on the Latenitesoft blog for an example). More specifically, one version of the library would be for the i386 architecture (i.e., the Simulator) and the second for the ARM architecture (i.e., the phone). This may be a perfectly fine solution for you if you really only need two versions, or if the source code for the library is kept private. That said, you’re still left with the task of maintaining pre-built versions of the libraries (plus the extra work of bundling them into the single file). In addition, I’m not sure that you can bundle more than two versions of the library into the binary (e.g., iPhone “release” and Simulator “release”, but not iPhone “debug” and Simulator “debug”).

How to Implement the Cross-Project Reference Solution

The instructions for setting up cross-project references to shared static libraries can be split into two parts:
  • Part 1: Global Xcode Settings
  • Part 2: Project-Specific Settings
Also, I’ll be using an example in the instructions to help illustrate things. A suitable example would be an application that needs to use a shared static library from a separate project. In this case, I’ll use a sample iPhone app called “Game Skeleton” (by Matt Sephton) that depends on a static library called libcocos2d.a (which is part of an open source project called Cocos2d-iphone).
Note: If it wasn’t already clear, cross-project referencing is a standard Xcode feature and is actually suggested by Apple in the official “Xcode Project Management Guide” documentation. You can certainly get some great bits of info from Apple’s guide, but as you’d expect, it’s a high-level document (hence my thinking that this tutorial could be helpful for others).

Part 1: Global Xcode Settings

The first step in getting your Xcode project to use cross-project referencing is to configure a couple of things that aren’t specific to any one project (i.e., global settings).

Set up a shared build output directory that will be shared by all Xcode projects.
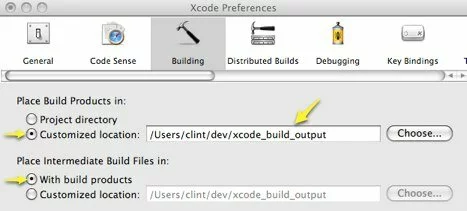
Screenshot showing how the Xcode preference dialog and how to configure Xcode to use a global build output directory.

Screenshot showing how the Xcode preference dialog and how to configure Xcode to use a global build output directory.
  1. With Xcode open, select “Xcode > Preferences” from the menubar.
  2. Select the “Building” tab.
  3. Set “Place Build Projects in” to “Customized location” and specify the path to the common build directory you created.
  4. Set “Place Intermediate Build Files in” to “With build products.”
Why is this necessary?
A brief explanation of why this is necessary might be helpful for some people. When you build your app (i.e., Xcode project) Xcode generates one or more “products” (object files, libraries, etc.) in the project’s own build output directory, by default; it will then “look” inside this directory when it comes time to link everything together and make an executable, for example.
Once you start using cross-project references, you’ll essentially be building more than one project. However, Xcode will still only look in the immediate project’s build output directory for libraries. Apple therefore recommends using a shared build output directory for cross-project references (see the last paragraph in the “Referencing Other Projects” section of “Xcode Project Management Guide: Files in Projects”). This ensures that Xcode will always be able to find products from other projects builds.
Will a shared build output directory cause problems?
I’ve had some questions from folks about whether or not using a shared build output directory causes problems. While I’m certainly not an authority on building with Xcode, I can say that in four months of using this technique (with several projects and a few different shared libraries) I’ve not had any problems (such as a “debug” build resulting in a “release” version of your library being overwritten, etc.).
Apple’s Xcode documentations clearly states that “Within the build directory, Xcode maintains separate subdirectories for each build configuration defined by the project” (see the “Build Locations“ section of “Xcode Project Management Guide: Building Products”). For example, I have a custom logging library that is used by multiple iPhone and OS X apps. The OS X versions of the *.a file show up in “Release” and “Debug” sub-directories within the common build output folder, the simulator versions in “Release-iphonesimulator” and “Debug-iphonesimulator”, and finally the device versions in “Release-iphoneos” and “Debug-iphoneos.” In other words, none of the builds seem to be overwriting each other.

Add a “Source Tree” variable that Xcode can use to dynamically find the static library project.

“Source Tree settings” are basically Xcode environment variables that hold paths to directories on the file system; this allows us to make the cross-project references flexible and avoid hard-coded paths.
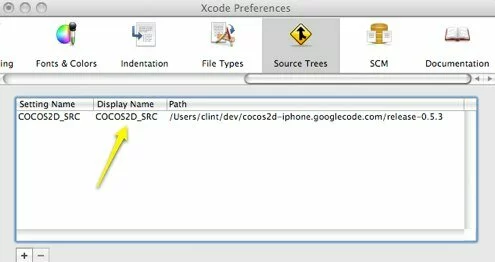
Screenshot showing the "Source Tree" settings tab within Xcode preferences.

Screenshot showing the "Source Tree" settings tab within Xcode preferences.
  1. Again, open the Xcode preferences.
  2. Select the “Source Trees” tab.
  3. Create a new Source Tree variable by clicking on the “+” button and filling in the columns. The screenshot above shows that we’re using “COCOS2D_SRC” for the cocos2d-iphone variable name and that it points to “/Users/clint/dev/cocos2d-iphone.googlecode.com/release-0.5.3″.Tip: avoid using special characters in the actual file path (i.e., stick to alphanumeric characters, underscores, and hyphens); this path will be used as a “Search Path” and Xcode seems to have problems with search paths that use characters like an ampersand (&).

Part 2: Project-Specific Settings

Once you’ve got Xcode configured to use a global build output directory and have a “Source Tree” variable pointing at your shared project, you’re ready to set up the cross-project reference, dependencies, etc.

Set Up the Cross-Project Reference, Header File Search Paths, and Static Library Linking

  1. Open your project in Xcode.
  2. In the “Groups & Files” pane of Xcode, select your project root and hit Option+Cmd+A (add to project).
  3. Find the Xcode project package for the project that contains the shared library. Using our example, we’ll select the Cocos2d-iphone Xcode project (cocos2d-port.xcodeproj): 
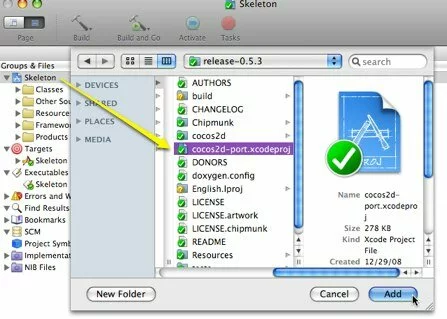
  4.  
  1. Screenshot showing a second Xcode project file being selected so that we can add a reference to it.
    Screenshot showing a second Xcode project file being selected so that we can add a reference to it.
  2. When the “Add to Project” dialog is displayed, use the same settings displayed in the screenshot below and click the “Add” button.
    Important: do NOT check the “Copy items” box.
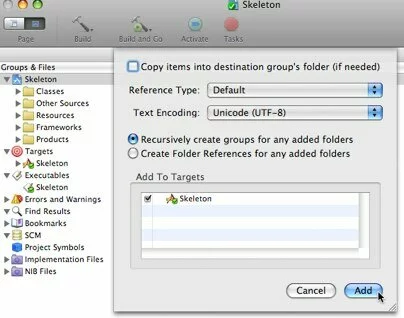
    Screenshot showing which "add to project" options are selected when adding a cross-project reference in Xcode.
    Screenshot showing which "add to project" options are selected when adding a cross-project reference in Xcode.
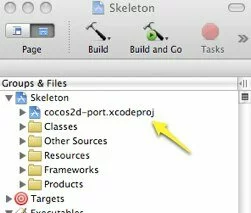
  3. After you click the “Add” button the project will appear as a “sub-project.” In our Cocos2d-iphone example, it looks like this:
    Screenshot showing how the Cocos2d-iphone Xcode project appears as a "sub project" once it has been added to the main "Skeleton" project.
    Screenshot showing how the Cocos2d-iphone Xcode project appears as a "sub project" once it has been added to the main "Skeleton" project.

    Remember that you have not imported a physical copy of the second project–it’s a reference.
  4. When the cross-project reference appears select it and hit Cmd+i. Then change “Path Type” to be relative to the environment variable you set up in Part 1. In the example below, we’re using the COCOS2D_SRC variable:
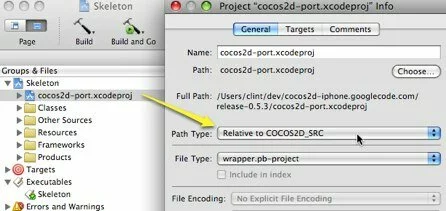
    Screenshot showing the Xcode "Project Info" dialog for a project added via cross-project reference.

    Screenshot showing the Xcode "Project Info" dialog for a project added via cross-project reference.

Configure the Library Dependencies, Linking, and Header Files

  1. In the “Groups & Files” pane of Xcode, under “Targets”, select your main app target and hit Cmd+i. Then select general tab and add the static library(ies) your app needs from the shared project by clicking the “+” button under “Direct Dependencies”. In our example, we’ve added the “Chipmunk” and “cocos2d” libraries which are both built from the Cocos2d-iphone project:
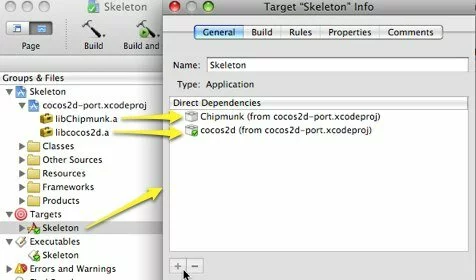
    Screenshot showing an Xcode executable target being configured to depend on static libraries that are built from a cross-project reference.

    Screenshot showing an Xcode executable target being configured to depend on static libraries that are built from a cross-project reference.

  2. Click on the build tab and scroll down to the “search paths” section
  3. Important: If a hard-coded path to your shared project appears in the “Library Search Paths” field, delete it. This can be done by double-clicking the field and using the “-” button.
  4. Double-click on blank area next to “User header search paths”. Then click on the “+” button, check the recursive checkbox, and type in the Xcode environment variable that points to your shared project directory, surrounded by $(). The example screenshot below shows $(COCOS2D_SRC) being used:
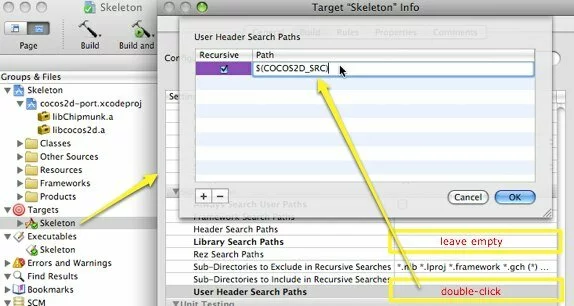
    Screenshot showing how to configure the Xcode "User Header Search Paths" for a library that is being included via cross-project reference.
    Screenshot showing how to configure the Xcode "User Header Search Paths" for a library that is being included via cross-project reference.

  5. When you click OK and go back to the Build tab, the “user header search paths” text field should show an absolute path to your shared project directory. In our example, $(COCOS2D_SRC) expanded to the actual path and ends with “**” to show that the search will be recursive:
    Screenshot showing how an Xcode environment variable will be dynamically expanded to the actual, absolute path once entered using the $() notation.

    Screenshot showing how an Xcode environment variable will be dynamically expanded to the actual, absolute path once entered using the $() notation.

  6. Finally, click and drag the static libraries from underneath the cross-project reference to “Targets > {your target} > Link Binary with Libraries.” This ensures that that the .a files will be passed to the linker when you do the build. Here’s a sample screenshot from our example app:
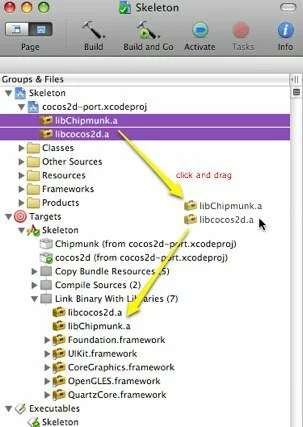
    Screenshot showing how to link your executable to the static libraries via cross-project reference in Xcode.
    Screenshot showing how to link your executable to the static libraries via cross-project reference in Xcode.

Summary

To recap, if you need to share code across different iPhone projects I suggest 1) putting the shared code in its own “static library” Xcode project and 2) using a cross-project reference so that you can build the library with your own app as needed. The verboseness of this tutorial might give you the impression that setting this up is a lot of work; it’s not, really, especially if you do it more than once (which is likely, considering that the goal here is to share code across multiple projects). I’ve been using this approach for about four months with several projects and it’s definitely saved me a lot of time. Finally, there might be a better strategy that I’m not aware of; feedback and suggestions for alternate solutions are certainly welcome.

App Store Rejection Reasons


Your Ad Here


Bugs
One of the larger categories of App Store rejections is probably plain bugs. If the app crashes during the review testing it will be rejected. Test your app thoroughly before you submit it. Make sure you test it on multiple devices, different OS versions and specifically under varying network conditions. Since all developers hate testing their own code, write unit test code for your regression testing.

HIG

Discoverability is a problem with touch interfaces. (Hover with your finger above a button and see if you get any hints as to what the button does…) Users know how UI:s work by convention and they have been trained by Apple’s built-in apps. If you use a button image or a UI metaphor in an unconventional way, you will confuse users. This is why adherence to the HIG is so important, and why Apple is so nitpicky in enforcing it.

Here are some concrete examples of HIG violations:
  • Tapping an action button (a rectangle with an arrow coming out of it) must result in an action sheet where the user can select an action or cancel.
  • The same holds true for all built-in icons. Make sure that your app behaves exactly as Apple’s apps to when you tap one of these icons.
  • Don’t leave activity indicators spinning forever. This can easily happen if you don’t trap errors properly.
  • TableViewCells must not have state, i.e. make sure that the highlight is removed when the selection action is done. If you use a UITableViewController rows are automagically cleared for you when the screen is shown. If you’re rolling your own, add this to your code:
- (void)viewWillAppear:(BOOL)animated
{
 NSIndexPath *tableSelection = [self.tableView indexPathForSelectedRow];
 [self.tableView deselectRowAtIndexPath:tableSelection animated:NO];
}

Lite Versions

The rules surrounding Lite versions of apps are murky at best. I have not had any issues with this, but here are some items I’ve heard from other developers:
  • A Lite app cannot appear to be crippled. For example visually disabled buttons or sections of the app are not allowed.
  • You cannot prompt the user to upgrade to the full version.
  • You cannot display the price of the full version inside the Lite app.

Internet Connectivity

If your application depends on Internet connectivity and it’s not available, then you must display a message to the user. This is actually trickier than it sounds to implement in your code. Most people base their connectivity checks on Apple’s Reachability code, which is using that sample code for the wrong purpose. If you need to get data from a specific server, then try to download some data from that domain. If that’s successful then you have the necessary connectivity. A special case to test for is WiFi hotspots that require a login to get online. Go to your nearest Starbucks and test your app. The Starbucks WiFi hotspots also have the additional quirk of allowing access to the apple.com domain, which may be what your connectivity test uses if you just copied Apple’s sample code.
It is my experience that Apple always tests applications under no connectivity conditions. Save yourself some approval time and test this yourself first.

Excessive Bandwidth Usage Over Cellular Networks

“Bandwidth hogs” was on Apple’s original list of forbidden fruit when the SDK was introduced. Unfortunately they have never defined exactly what the limits are. If you streaming or downloading a lot of data, make sure your application knows what type of network is in use and it has the ability to throttle or switch to a stream with a lower bit rate if necessary.

Device Capabilities

There are a few differences between the various iPhone and iPod Touch generations. Don’t assume that the device running your app has a particular capability. In one app I had a settings screen where the user could turn off vibrations. That setting obviously has no effect on an iPod Touch, and the app was thus swiftly rejected.

Private API:s

Calling private API:s has always been verboten. Some developer have tried to argue that some API components are “more private” than others. For example it seems less nefarious to pass in an undocumented parameter value to a public API than linking to a private framework. In the long run I think such distinctions are futile. If your business depends on your app being approved, then stay clear of anything that is not documented as official by Apple.
In the beginning a lot of apps got away with breaking this rule. Now Apple has more sophisticated scripts that scan your code looking for violations.
One particular API has been the source of some amusement: the private Coverflow API. Several developers, myself included, have had apps rejected for using this API when we in reality had spent a lot of time and effort in building a reasonable implementation of Apple’s coverflow user experience. I guess we should be flattered that Apple mistook our implementation for their own.

No Interpreted Code

You cannot create an app that downloads and executes code that was not present in the app bundle submitted to Apple. This rule puts the kibosh on emulators (NES, C64, etc) and effectively kills alternative web browsers (you would want to run JavaScript in the browser) as well as Flash.

Limited Functionality

This was a common rejection before the “fart category” was approved. In the beginning of the App Store it was not uncommon to see apps that simply opened a web view to a company’s web site. The goal was to get traffic to the web site, with the idea that competing with a few hundred apps was much easier than competing with millions of other web sites. With 140k apps, being noticed in the App Store is probably as difficult as on the web. In any case, Apple will reject simple UIWebView apps without any additional functionality.

Duplicates Functionality

This is a tricky one. There have been several high-profile cases where an app has been rejected for duplicating functionality of a built-in app. But having built a web browser appwith parental controls that was approved without any major delay, I don’t know where the line goes.

Contests and Sweepstakes

Apple now allows both contests and sweepstakes within applications. The new rule, found in section 3.3.17, states, “Your Application may include promotional sweepstake or contest functionality provided that You are the sole sponsor of the promotion and that You and Your Application comply with any applicable laws,” adding that developers must “clearly state in binding official rules for each promotion that Apple is not a sponsor of, or responsible for conducting, the promotion.”

Handling of User Data

If you collect any user information and that data is sent to a server then you need to explain to the user what is about to happen and give an option to opt out. This applies, for example, to highscore and leaderboard liets. And even if the information submitted is just a bogus name that the user enters specifically for this purpose.
If your app uses Core Location for the sole purpose of serving ads or user tracking, then your app will be rejected. The use of Core Location needs to provide some benefit to the user. See Apple’s announcement.

Copyrighted Content

It goes without saying that you must have the rights to the content that you include in your apps. Recently Apple has begun checking and enforcing this more seriously. You need to know your copyright and trademark law to stay clear of violations. For example there have been several cases where developers have replicated old console games on the iPhone and the original owners of the game have complained to Apple resulting in the removal of the app from the App Store.

Use of Trademarked Images

If you display an image of an iPhone, or any other Apple product, inside your app it will be rejected unless you have received written approval from Apple to use that image. What exactly constitutes iPhone likeness? Some developers have reported that removing the home button circle is enough.

Objectionable Content

This is another big and sticky one without any clear guidelines from Apple. Here’s my experience:
  • Nudity is off limits, even with a 17+ rating.
  • For women in bikinis, images are rejected seemingly at random. One reviewer will object to a particular image and pass others, the next reviewer will find an objectionable image in the batch that the first reviewer passed. And on it goes.
  • Anything related to politicians will most likely be rejected.
The app reviewers seem to go to great lengths to find objectionable content by explicitly searching for swear words, or seeking out specific ebooks to download which may contain anything objectionable.
Another source of hilarity is content that actually doesn’t exist in the app. Remember the Twitter client that was rejected for displaying a trending hashtag that contained a bad word? To the app reviewers defense I must say that it can often be very difficult to know what content comes from the app itself and what is coming from a different source. The result seems to be that the source doesn’t matter. If it’s displayed within your app, you’re responsible for it. See also the next section about web views.

UIWebViews

If your application has a web view that allows unrestricted access to the Internet where scary things lurk, then you are automatically slapped with a 17+ rating. Why the built-in Safari app is not consequently shielded from minors is a mystery. But those are apparently the rules.
Now unless you are building a web browser, it seems unnecessary for you to allow full and unrestricted access to the Internet from within your app.

Transactions Outside The App Store

Apple doesn’t want you to conduct any commerce outside the App Store. Before In-App Purchasing was available we developed an app that allowed the user to purchase additional credits using a third party payment service. That feature had to be removed. Another of our clients has a calling card type app. If you have a calling card you typically have an account that you may want to check the balance of, and you may want to add more money to it using your credit card. It took several submissions to get the wording surrounding these features to Apple’s liking. In the end all references to an account were removed and all links to the vendor’s web site opened Safari instead of an internal web view.

Price Information

Do not display the price of an application inside your app or in your application description. The very reasonable explanation for this is that App Store prices/currencies vary from country to country.

App Icon and App Store Image

The 57×57 application icon and the 512×512 App Store Image must depict the same thing.

Application Description

This doesn’t have to do with development per se. But when write the App Store description make sure that you are describing the application correctly. If you describe a feature that is not there, then you will be rejected.
The same is true for the update notes. If your app update doesn’t exactly address the things you list in the “what’s new in this version” notes, you will be rejected.

App Store Keywords

The keywords you enter for your application have to be relevant, as Apple sees it. If your app is about football, don’t use a basketball keyword just because you think there’s an overlap in the demographics. And don’t use trademarked words, e.g. ESPN, or names of other App Store apps.
The punishment is that you’re app will be rejected, not just the description. You have to resubmit the binary and go to the end of the line.

Updates Are Reviewed As New Apps

Just because your app was approved once doesn’t mean that the original features are “safe” when you submit an update. It appears that all updates are reviewed as if they were brand new apps. A HIG violation that has been approved 5 times may be caught and rejected on your 6th app update.

iPad Specific Rejections

Support all four orientations

The iPad Human Interface Guidelines state that an iPad application should be able to run in all orientations. There are certain applications that need to run in the portrait orientation, it would be appropriate to support at least both variants of this orientation in your application. Supporting all four orientations, each with unique launch images, provides the best user experience and is recommended.
Popovers
Do not launch one popover from within another popover. The iPad Human Interface Guidelines state that only one popover element should be visible onscreen at a time.

More Advice

Unfortunately this list is not complete, as only Apple knows the extent of the hidden rules. Also, with a few exceptions that are anecdotal or widely known, the items on this list are rejections that I and my colleagues have personally experienced.
Here is a list of tips from Apple: App Store Submission Tips. It only contains a handful of items at the moment, but it’s a good sign from Apple. Since this should count as the official word from Apple, I sincerely hope that this list will grow to encompass all the “hidden” rules that have been painstakingly discovered by developers over time.
Until that happens, here are a couple of good resources with app rejection advice from other developers:
And some good humor:
UPDATE: Apple has finally published the App Store Review Guidelines. I will keep this page live for historic reasons, but hopefully it will not need to be updated any more since Apple describes their guidelines as a living document that will be amended over time as they craft new rules.

How to add multiple static library files with different architectures to Xcode


Your Ad Here


When you work with a static library (e.g. libCoolCode.a) for an iPhone project in Xcode, you can either have a fat binary that contains code for both the iPhone simulator and the iPhone device in the same file, or you may have two separate files that you need to add to Xcode.
Adding a single static library to Xcode is trivial. Here are the step by step instructions for the latter case.

1. Add the files to Xcode

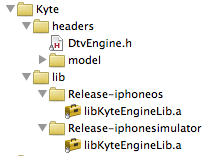
Use the normal Add > Existing Files… to add both the header files and the library files to your project. The result should look something like this:
LibraryAndHeaderFilesAddedToXcode.png


2. Add the header files to the search path

A static library comes with one or more header files (.h) that you need to add to your project build settings. (This step is the same for a single library file as for multiple files.)
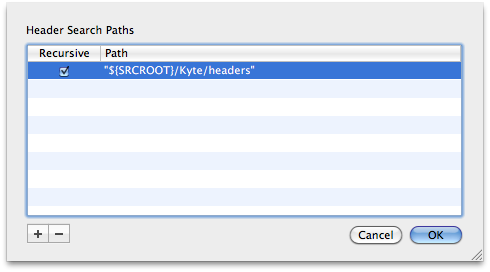
Open the build settings tab and find the “Header Search Paths” entry, and add the path to the directory with the header files.

AddHeaderSearchPathToXcodeBuildSettings.png

For this particular library there’s a model directory under the headers directory which also contains headers files. That’s why the Recursive checkbox is checked. The double quotes around the path are needed to handle paths with spaces.
If you try to build the project for the simulator at this point you’ll probably get a compiler warning like this:
file was built for unsupported file format which is not the architecture being linked (i386)


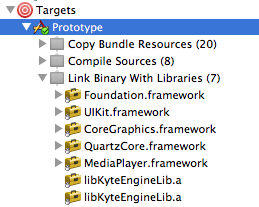
3. Remove the library files from the build target

Open the Targets tab and the target of your project and you’ll see that the library files you just added were also added to the list of libraries to link with.
LibraryFilesInTargetLinkFolder.png

Delete these two entries.
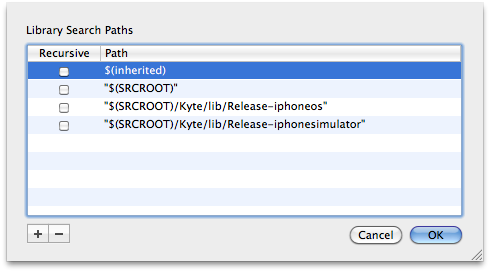
You may also have to delete these entries from the build settings. In the build settings tab find the Library Search Paths entry and delete the two entries.

DeleteLibrarySearchPathInXcode.png

That will get rid of the compiler warning above, but the linker will complain since the required libraries are no longer linked.

4. Add the libraries as other linker flags

Again go to the build settings tab and now find the Other Linker Flags (OTHER_LDFLAGS) entry.
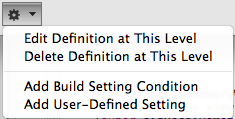
Highlight the Other Linker Flags entry and click on the tool drop down button at the bottom of the window.

XcodeBuildSettingsToolsDropDownMenu.png

Select Add Build Setting Condition from the drop down menu. This will add a new line under the Other Linker Flags entry. Change the first drop down from Any SDK to Any iOS Simulator. Leave the second drop down as Any Architecture. In the value field enter the path and name of the library file built for the simulator. Repeat this step for the device build, selecting Any iOS Device. The result should look similar to this (your paths will of course be different):

OtherLinkerFlagsConditionalBuildSettings.png

Your project should now compile and run for both the simulator and the device.

 
Submit Express Inc.Search Engine Optimization Services